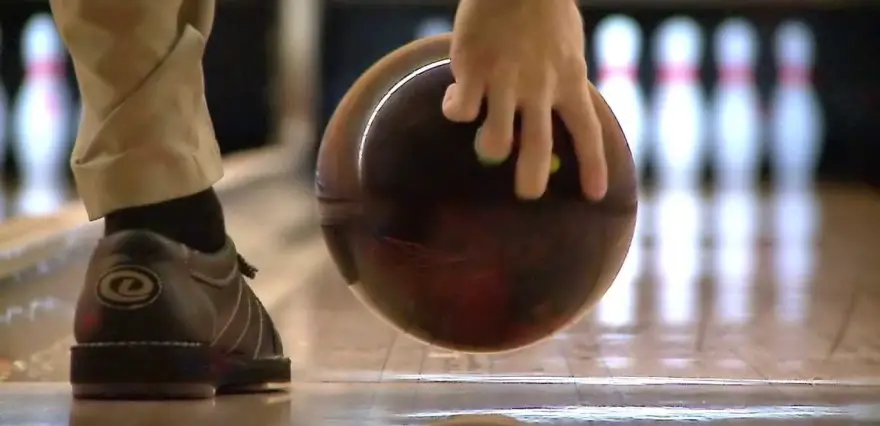
We’ve all gone bowling before and been terrible.
No matter how good you are at other sports bowling is just something that can make even the most athletic people look clumsy and goofy if they don’t do it right.
In fact those of us who have spent years practicing and improving little by little know how rare it is for someone to just pick up a ball and do it all right without any input from an experienced friend or coach.
It’s just not easy to bowl properly without practicing hard.
Obviously it takes zero talent or knowledge to roll a ball down the lanes towards the pins, even small children can do that on their own but do properly throw a curve and increase your strike percentage and average is not as intuitive.
As you might have learned by reading a bit about me I am a very experienced bowler who consistently averages in the range of 220 to 225 on a standard house pattern. My tournament average and challenge condition average is probably closer to 210 though so I am not up to professional standards.
I do however know a thing or two even if I can’t quite compete at the highest level so I hope you’ll take my opinions as you would those coming from an actual authority on the subject.
As a rule of thumb the vast majority of bowlers are either new bowlers just learning the game or seasoned and experienced bowlers who average between 150 and 200 on house conditions.
I can’t write this article for everybody because you have to teach fundamentals before you get to high level details that only apply to the top tier of bowlers worldwide.
In this article I’m going to lay out the foundation of bowling for the beginner or for low average league bowler and then use the remainder of the page as an index for the more advanced or specific concepts of bowling that may only apply or be of interest to a small portion of my readership.
So, lets begin with the simplest of topics and the proceed down the rabbit hole.
Note: This entire article assumes you have a custom fit bowling ball. If you are using a house ball that isn’t fit to your hand then a lot of this article wont be easily applied.
Straight Ball vs Curve: Why There are no Pro Bowlers Throwing a Straight Ball
 When a bowling ball is thrown straight, end over end with no axis tilt or axis rotation (the very basic necessities of throwing a curve) and the bowling ball hits the headpin it will instantly deflect to the left or right and pass right by the 5-pin in the middle of the pin deck.
This happens every time unless the ball hits the headpin dead center in which case the head pin and the ball will pass straight through the middle of the pin deck leaving a wide split that can be nearly impossible to pickup consistently.
There are times when a bowler gets lucky and gets a strike either when the ball deflects in the pocket either left or right. There are also times when a bowler gets lucky and strikes even when the ball hits the head pin in the center and passes straight through the pin deck but the odds are not in the bowlers favor unless the ball enters the pocket with what we call entry angle.
This means the ball should be hitting the side of the head pin on an angle relative to the boards of bowling lane to maximize your chances for the ball to drive through the pin deck with little to no deflection. When this happens the pocket pins are split and they both fall to their respective sides taking out the corner pins preventing those big nasty splits.
I’m not a physicist or mathematician so I wont go into the math behind this but the optimal angle on entry to the pocket to achieve a strike is roughly 5 degrees off of parallel to the lane… assuming the ball is also on the 18th board after traveling 60 feet down the lane.
You see the head pin is centered on the 20th board so to hit the side of it your ball will be at the 17th-18th board at the point of first impact.
Related Reading: How to Curve a Bowling Ball
So is it Possible to Throw a Straight Ball into the Pocket at a 5 Degree Angle?
Every bowling lane is made up of 39 parallel boards with a combined width of 41.5 inches.

That means every board is approximately 1.05 inches wide.
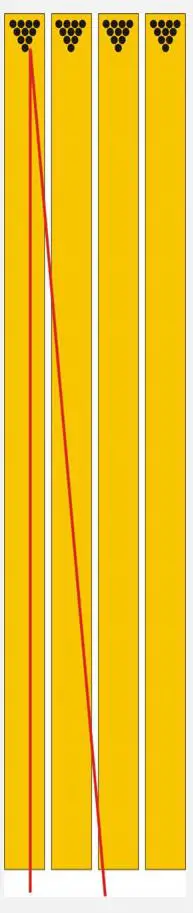 The entire bowling lane is from the foul line to the headpin is 60 feet or 720 inches.
If we want the ball to enter on an angle we could throw it straight from the 1 board at the foul line to the 18th board 60 feet later but what would that angle be?
Well using a basic rise and run calculator we know that the run is 60-feet and the rise is the width of 17 boards we have to cover. 17 boards x 1.05 inches = 17.85 total inches. With a run of nearly 18 inches we get an entry angle of nearly 1.5 degrees.
This entry angle is much to small to reliably strike on any given shot!
In fact running the math (playing with that calculator) we find that the lane would have to be only 17 feet long for a straight ball to have a chance to achieve a 5 degree entry angle!
For a full 60 feet a straight ball would have to be thrown from two lanes over!
Because the lane is so long (and narrow) the only way to increase the entry angle is to throw the ball down the lane for a bit before making the ball turn toward the pocket with a hook.
Outside of making the lane shorter or wider we have to throw a hook to have any chance of getting that entry angle up.
This obviously leads us to our next main topic:
How to Throw a Basic Hook
Now that I’ve hopefully explained why you need to learn to throw a hook to bowl properly its time to say a bit about how to do it.
Now, this topic is huge and I will probably further develop the topic as a stand alone article on the site at some time in the future but for starters I will introduce you to only two concepts in an attempt to keep things simple.
Keep It Simple Stupid = KISS = Golden Rule in my Book
To throw a hook you nee to throw the ball straight down the lane with some amount of axis rotation.
Think of your car. You are driving forward and the car won’t ever turn until your wheels axis rotate left or right.
When your wheels rotate left a little bit your car turns gently.
When you turn your wheels to the left sharply then the car turns to the left violently.
Now think of a quarterback throwing a football. The quarterback will thrown the ball straight down the field but put a spiral on it. That spiral is a 90-degree axis rotation in relation to the direction the ball is traveling.
With the football the ball does not change direction in the air due to an insufficient amount of friction. The spinning ball does encounter friction with the air but it is not great enough to change the direction of the ball.
If you were to take a football and throw an underhand spiral to a friend while playing catch you would basically be imitating the motion needed to hook a bowling ball. You would be throwing the ball with both forward momentum and with heavy axis rotation.
Most people however cannot hold a heavy bowling ball underhanded the way they hold a football underhanded so putting that axis rotation onto the bowling ball is much harder.
It must be done when holding the ball on the side or the top.
Related Reading for Beginners: How to Hold a Bowling Ball Properly
Professional bowlers and experienced amateurs have typically figured out how to rotate the axis of their ball upon release while keeping their fingers on the side of the ball but for true beginners the easiest way to add some axis rotation and create a simple hook is to start with the basic suitcase technique.
You literally hold the ball as you would a suitcase. Your palm will be on top of the ball with your thumb closest to your thigh and your fingers on the other side of the top of your ball.
If you were to stand at the foul line and swing your arm in this position like a pendulum never letting go of the ball and never turning your hand in any way at all you would start to feel what the release should feel like without ever letting go of the ball.
By placing your thumb all the way into the thumb hole and using a finger tip grip you would eventually let the ball go on the forward swing. When you do this (assuming you are not turning your wrist at all) the thumb will exit the ball a split second before the finger tips do. You will feel the pressure of the ball falling off your hand in your finger tips and the ball will start traveling down the lane with some axis rotation, possibly even 90 degrees of axis rotation, otherwise known as a full roll.
The suitcase technique as I’ve described above was a very common way to bowl a curve decades ago and although it still works modern lanes and bowing equipment have made other techniques of curving the ball more conducive to high scores but nevertheless I firmly believe the suitcase technique is the easiest way to learn how to throw a hook.
Here’s a demonstration video on YouTube of the basic suitcase delivery.
Notice how the bowler’s hand is on top of the ball at the release with the thumb close to the thigh and the fingers on the outside of the ball, away from the body. The thumb exits the ball first and the ball rolls off the fingers resulting in extreme axis rotation but a very low rev rate and speed of delivery.
Most people can get a basic hook of their hand in a bowling alley after only practicing this delivery technique for five minutes or so. The hook won’t be big or consistent until the bowler does many games (hours) of practice but this is a starting point.
So Why Then Does the Ball Hook Way Down the Lane Instead of At The Heads?
No matter how you put axis rotation on your bowling ball it will never hook near the foul line because there is too much oil on the lanes at that spot.
Remember the football flying through the air with 90-degrees of axis rotation. The air doesn’t provide enough friction to change the direction of the ball and in the case of the boiling lane the oil on the lane doesn’t provide enough friction to change the direction of the ball either.
Oil is placed on the lane heavily on the heads for two primary reasons and a handful of secondary reasons that I won’t go into now.
- The first primary reason is to protect the wood from falling bowling balls and extreme potential friction from spinning balls off the hand.
- The second primary reason is to let balls with axis rotation slide down the lane so that they can later hook into the pocket.
Without the oil on the lane putting axis rotation on your bowling ball at release would be similar to turning the wheel of your car while you drive.
Once you turn the wheel on your car the tires grip the ground and change the direction of the entire car.
If a bowling ball encountered instant, heavy friction the ball would change directions right away and you could never hook a ball into the pocket, it ould always hook straight into the gutter way before getting down lane to the pin deck.
The oil on the heads (the front part of the lane) allows the ball to spin freely with very little friction while the ball skids down the lane. Eventually the layer of oil on the lane gets thinner and thinner as the ball travels down the lane until that layer of oil is essentially gone just a few feet before the pin deck starts.
Typically oil is placed on a lane thick near the foul line, thin in the middle of the lane, and with zero application near the pins. This is what bowlers sometimes call the front-to-back taper.
That’s why bowling balls that hook always hook the most near the end of the bowling lane.
Once you start practicing throwing a hook you will naturally start learning how to manipulate the hook by increasing or decreasing the skid, how to alter the location on the lane where the ball actually hooks or changes direction, and how to increase or decrease the severity of the change in direction.
Those however are advanced topics better suited for stand alone articles.
For the novice or aspiring bowler however practicing a proper approach (your footwork and arm swing) and then pairing that with your release is far more important.
How to Walk to the Foul Line and Not Look Like an Idiot
OK, so you know you should practice hooking the bowling ball and you are going to do this by practicing from a standing position or one-step approach next to the foul line for the next 5-10 games but what happens when everyone starts bugging you to stand back and walk to the line like everybody else?
Well, let’s look at this now.
To bowl that curve (assuming you are right handed) you need to swing your right arm forward while standing or sliding on your left foot.
The simple fact of the matter is that if you are standing on your right foot your arm cannot swing like a true pendulum, it has to swing around your right leg meaning the arm itself has to swing away from your body on the down swing and back in front of it on the upswing.
This is not conducive to good consistent bowling and it’s dangerous!
Take a look at this quick video to undewrstand what I’m talking about:
By planting on your left leg you can kick your right leg back behind you so that your arm and the ball (which is 8 and a half inches wide btw) can swing directly underneath you without having to arc out away from your body.
If you start learning with the suitcase approach then it’s as simple as taking 1-5 slow steps to the foul line and ending in a slide on your left leg.
Without having a ball in your hand stand on your right leg with your arm behind you as if you were about ready to throw a bowling ball. Then step onto your slide foot (the right foot) while you swing your right arm forward.
This is the motion you have to end on.
Here’s an excerpt from the Brad & Kyle channel where they are demonstrating the ball being released from the right hand while standing balanced on the left foot at the foul line. Notice that the ball stays on an almost perfectly straight path from the start of the swing to the end.
I always recommend new bowlers start with a no step approach while learning the release and then add a step gradually over time because it is hugely important to end on the correct foot with balance and control.
If you swing a bowling ball forward with your right hand at release then you have to counter balance your body with your right foot extending behind you and to the left so that you don’t fall over.
The most important thing is to keep the arm swing below your body straight (no side-to-side arc) and add a single step to your delivery every time you’ve mastered the delivery with fewer steps.
A good goal is to get to a five step delivery but maybe not on day one.
When you let go of the ball you should be fully supported by the slide leg. You should be standing on your slide leg with your arm extended directly in front of you and your non-slide leg (the right leg) extended behind you to the left.
If you have to put your second leg down and adjust to keep from falling over then you need to continue practicing the release with few steps and slower arm motion until you are in balance.
No matter how much you practice your hand release you will never be consistent with your bowling performance unless you figure out how to remain in balance at all times at your feet, especially at the moment of delivery.
Where Should You Stand to Bowl With a Hook
Assuming you are following along with me learning to release a basic hook and then focusing on staying balanced on your left foot at the foul line (opposite for left handed bowlers) then the next step is to stand a little bit left of center knowing that your hand swings approximately 7-8 boards to the side of our body.
If you stand at the middle dot on the approach and walk straight and slide with your left toe also pointing at the middle dot (the 20-board) at the foul line then assume that your ball is landing on the lane approximately 7-11 boards to the right depending on how wide your body is.
Let’s say your ball hits the lane at board 12 and you project the ball slightly to the right of the second arrow then the skid portion of the ball path will likely take the ball all the way out to around the 3rd to 5th board before a hook ever starts looking like it’s happening.
If your hook is not strong enough then you should move your feet to the right a board at a time keeping your projection angle mostly the same until the ball starts hooking back to the pocket.
If your hook is too strong and the ball hooks past the pocket then move your feet left a board at a time keeping the projection angle roughly the same until the ball hooks into the pocket as opposed to past the pocket.
For bowlers who have gotten good at releasing the ball similarly every time and sliding with consistency and balance then more advanced lane adjustments should be learned. These kinds of adjustments will be covered in different articles on this site.
Here’s my Summary of How a Beginner Should Learn to Bowl Properly
TLDR – For right handed bowlers take 1-3 steps and slide at the foul line on your left foot. Just before you slide you should have the ball behind you in the backswing. You should be attempting to throw a basic hook if you want a better chance of getting a strike and scoring higher. The easiest way to learn a basic hook is to hold the ball like you would a suitcase. Swing your arm under your body with the thumb on the thigh side of the ball from start to finish making sure to never twist your wrist. When you slide and the ball swings forward for your release let your thumb out and the fingers will follow a split second later with no effort on your part. The finger tips will feel the pressure of the release and cause the ball to enter into a ball motion of forward momentum and significant axis rotation to the left. Depending on the amount of rpms the ball rotates at and the speed your ball is thrown at the ball will either hook a little to the left or a lot to the left after it skids down the lane for a bit.
I would recommend all aspiring bowlers to practice this release in the simplest of ways possible for a lot of games before trying to add steps to the approach, speed to the arm swing, or rotation to the wrist.
Adding steps to the approach and speed to the arm swing allow you to throw the ball faster which will result in better scores. Learning to rotate your wrist and impart axis tilt and additional revs on the ball will definitely help with controlling the arc of the ball and the strength of it’s direction change as it drives into the pocket.
Most people practice and bowl for years without ever averaging 200 so don’t be dismayed but also don’t assume you cant achieve high scores regularly if you practice your delivery regularly. It’s not uncommon for new bowlers to start throwing high games in the low 200’s in the first year, just don’t ever expect it to happen regularly until you’ve put in the time practicing!